![]()

Return to the Ask TV Menu
How to make a Manual (human powered) Balloon Pump
4-17-2011
This basic pump design is very common and is made by many companies. All of these parts are very common and can be easily purchased at your local hardware, plumbing or lumberyard store. To use the pump:
- Stand on the bottom plate
- Grab the handle and pull the top section up, but not off.
- Put the balloon nozzle on the pump nozzle, hold the balloon in place.
- Push the top section down
- Remove the balloon and tie a knot in it.
Total Parts List for building a Balloon Pump
- Plywood: one ¾” x 12” x 12”
- One 3” Toilet Flange (be sure to read #2 below under “A” before buying)
- 2 feet of 3” PVC Pipe
- Two 3” couplers
- One 3”x 1-1/2” reducer
- One vacuum cleaner head drive belt
- One 2-1/2” diameter rubber ball
- One 26” long piece of 4” PVC pipe
- One 4” PVC coupler
- One 4” PVC End Cap
- One balloon filling nozzle (be sure to read #4 under “B” before buying)
- One handle (be sure to read #5 under “B” before buying)
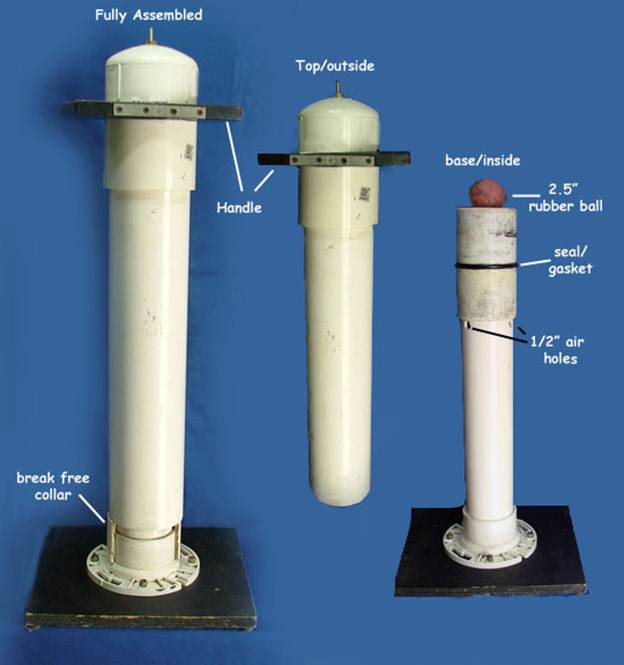
- Starting with the “Base which is the Inside of the pump:
Collect/Buy/Prepping the materials:
- At the very bottom is a ¾” thick piece of plywood about 12” x 12”
- (note: all of these pipe fittings are PVC) Mount a 3” toilet flange. Caution: there are 2 or 3 variations of the Toilet Flange. Buy the 3” pipe first and then buy the Toilet Flange by using the picture that we provide. Try each flange on the pipe until it looks like our picture.
- You only need about 2’ of 3” pipe total. Cut the first piece 18” long. Cut the second piece 3-1/2” long.
- Get 2 - 3” couplers
- At the top is a 3”x 1-1/2” reducer.
- Get a vacuum cleaner head drive belt. This will become the Seal/Gasket.
- Get a 2-1/2” rubber ball, any kids rubber ball will do as long as it is fairly smooth no ridges, groves, or bumps and close to 2-1/2” inches in diameter. The ball acts as the air valve. Even though it sits on top of the Reducer, it needs to fit and seal against the 1-1/2” hole in the reducer. The ball will not sit inside of the 1-1/2” hole in the reducer. It sits on top of the hole, see picture.
Page 1
Assemble the Base which is the Inside of the pump:
- Starting at the bottom, Mount the Toilet Flange to the bottom board.
- Glue the 18” long piece of 3” PVC Pipe to the Toilet Flange with PVC Glue.
- Glue the first coupler to the 18” long piece of 3” PVC Pipe.
- Glue the 3-1/2” long piece of 3” pipe to the first coupler.
- Glue the second coupler to the 3-1/2” long piece of 3” pipe.
- Glue the 3”x 1-1/2” reducer in the top end of the second Coupler.
- Drill four ½” air holes (about 90° apart, around the 3” pipe), see picture, near the top of the 18” long pipe just below the first coupler.
- Take the vacuum cleaner head drive belt, use a sharp knife, make one cut through the drive belt so that you can stretch it out. Wrap the belt around the grove that is formed between the two couplers. Cut the excess belt off so that the two ends of the belt just touch. Using Super Glue, glue the two ends together, and place it in its position on the finished base assembly. Lube the Seal/Gasket with an appropriate rubber-safe lube at least once a year or as needed.
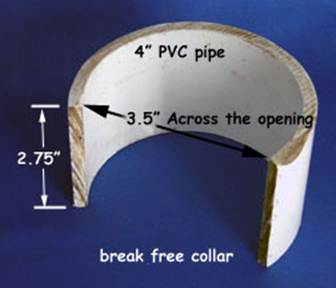
- Snap the Break Free Collar around the bottom part of the base just above the Toilet Flange. If your pump has not been used in several months the Seal/Gasket may stick to the inside of the Top/Outside section. The easiest way to break them free is to remove the Break Free Collar (just grab it and pull it out to the side), pick the pump up to about chest high and slam it squarely down on its’ wood base. I know this sounds a bit crude but it is very effective. Once the two sections of the pump are loose again be sure to reinstall the Break Free Collar as described above. Do not do this in your house because you may damage you floors.
- Starting with the “Top which is the Outside of the pump:
Collect/Buy/Prepping the materials:
- One 21 ¾” Long 4” PVC pipe and one 4” long piece of 4” PVC pipe
- One 4” coupler
- One 4” PVC End Cap
- One balloon filling nozzle, There are several ways to go for this part.
- I have used plastic screw on caulk gun nozzles and they are good.
- ¼”x½” or smaller Nylon Barb to MIP Adapter sometimes it is hard to get smaller barb fittings.
- 3/16” Barb x ¼” MIP brass, this is a better size but sharp brass edges are hard on balloons. If you choose to use a metal part for a nozzle be sure to sand/remove all sharp edges!
- One wood or metal handle. In general the handles are about 6 ½”x 9” with a 4 ½” diameter hole in the dead center
Page 2
Assemble the Top which is the Outside of the pump:
- Cut one piece of 4” PVC pipe21 ¼” long. On the inside of one end of the pipe grind, sand or file a bevel slopping to the inside of the pipe. This will help slide the pipe over the seal/gasket when you put the “TOP/Outside” onto the “Bottom/Inside”. Cut a second piece of 4” PVC pipe, 4” long. Glue the 4” coupler to the end of the 21 ¼” long piece of pipe that does not have the bevel.
- Glue the 4” long piece of pipe into the 4” coupler.
- Put the handle over the 4” long piece of pipe. As the picture shows below, the handles can be replaced by making a new handle just like the original handle, cut the new handle across the width of the handle at the center of the hole. Position the two half handles where the original handle was and use metal bars with screw hole to hold the two halves together.
- Glue the 4” End Cap on to the 4” piece of pipe which will hold the handle in place.
- As you saw in step# 4, you need to make a decision on the kind and size of your nozzle. Based on the nozzle you picked TAP a hole in the top center of the end cap. Wrap pipe tape around the threads and thread the nozzle into the cap.
- Lube the Seal/Gasket with an appropriate rubber-safe lube.
- Slide the Top/Outside over the Bottom/Inside. You are done!
Free instructions provided by Apple Sauce Kids at https://applesaucekids.com
Enjoy!
Page 3
Page 4